Good day dear Android Users, here is an exclusive tutorial on how to Root Sonny Ericsson Xperia x10. Just as the Symbian User thinks of how to hack their Symbian Phone and Sign their Applications, how iPhone/iPad Users think of how to Jailbreak their Devices to make use of some Applications and beats of their limitation, this is a major reason why Android Users need to Root their Android Phones to enjoy their Device to the fullest. Why Rooting? Let’s start with why you would want to root your Android Smartphone. Sometimes applications require special permission that the Android OS, which is based on Linux doesn’t allow. These could be simple as taking a screenshot to higher level permissions to the core Android files. Rooting makes your phone run faster, increases battery life, allows it to run more applications, custom software and ROMs which allow complete control over every aspect of your device by allowing Superuser and Admin Level Permission. Removing carrier bloatware is a particularly enticing application and much more. Enough for the introduction let’s proceed with the Tutorial for today.
Contents
Guide to Root your Gingerbread Xperia X10
Warning: You must Back-up your Device before you Start the Rooting Steps. Read the instructions in full carefully before applying each process. You need to be on stock Android 2.3.3 for this method to work. Preparatory steps
- Download Flash Tool (version 0.2.9.1) from here. Double click to extract and install the files. The FlashTool can be started by double-clicking X10FlashTool.exe.
- Enable Unknown Sources (Menu -> Settings -> Applications -> Unknown Sources) & USB debugging (Menu -> Settings -> Applications -> Development -> USB Debugging) on your Xperia X10.
1. Start FlashTool [Make sure your Xperia X10 is not connected to your PC] Start FlashTool by double-clicking X10FlashTool.exe in the folder where you extracted the files. Then press the ‘Flash’ button on the top left.
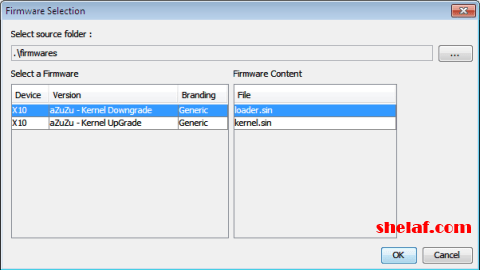
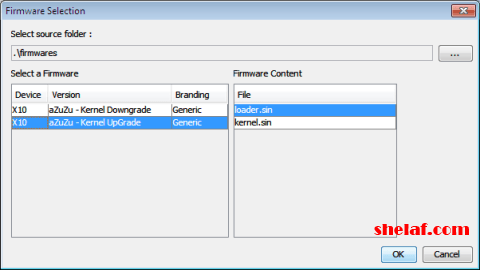
2. Kernel Downgrade Highlight ‘aZuZu – Kernel Downgrade’ and make sure that under Firmware Content, ‘loader.sin’ is highlighted. Click OK.
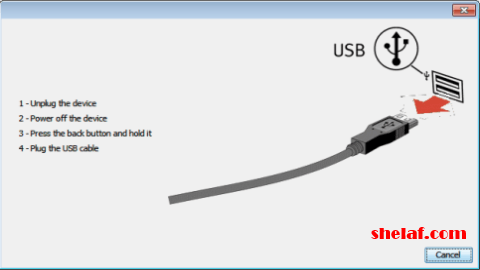
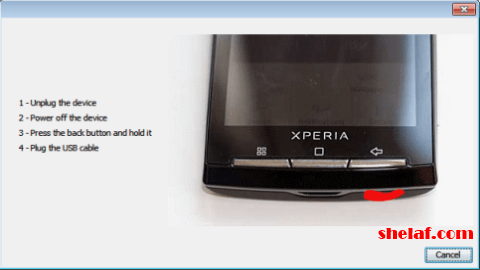
3. Plug in handset As per the instructions below, make sure your handset is powered down. Then hold the ‘Back’ button on the handset whilst plugging in the USB cable.
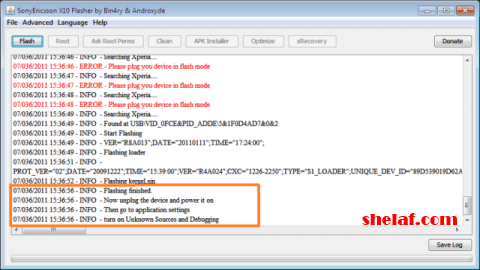
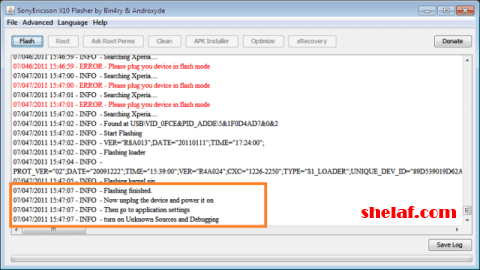
4. Flashing process The handset will then be flashed and you should see an output as seen below. Remove the USB cable but keep Flashtool running.
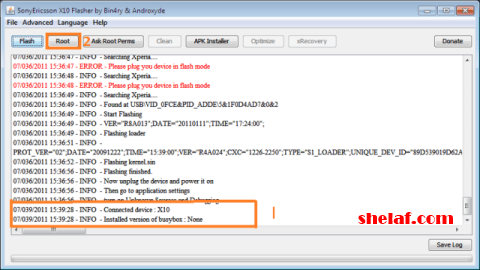
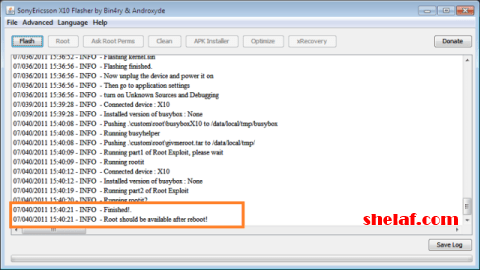
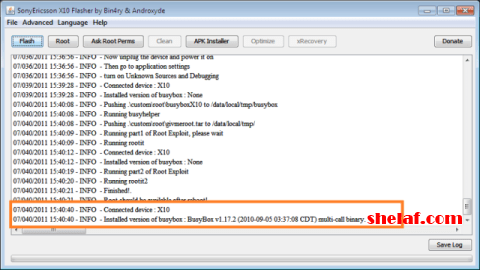
5. Root device Now disconnect the Xperia X10 (keep FlashTool running). Power on the device and as soon as you feel the vibration, re-connect the X10 via USB. You will then see the output as indicated by number 1 below. Once that has been completed press the Root button (indicated by number 2 in the picture below).
Once the device is rooted you will see the output as per below. Keep the phone connected as the phone will then reboot.
Once you see the messages that the X10 is connected, disconnect the handset and take the battery out for 30 seconds.
6. Upgrade Kernel Now you need to upgrade the kernel, so press the ‘Flash’ button on the top left of the FlashTool. Select the bottom firmware and press OK.
The message to connect your X10 will come up again. Make sure the X10 is powered off, then whilst holding the back button connect it to your PC via USB.
The FlashTool will then complete the flashing process and when you see the output below you can remove the USB cable and power on your Xperia X10.
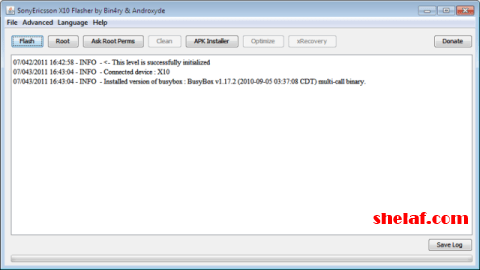
7. Success! If you connect it to FlashTool again you will see the message below. Congratulations, your phone should now be rooted.
Share or Like this Post if you Find it Informative and Cool… Thanks. Never miss any of my future post CLICK HERE TO SUBSCRIBE Once entered, you will have to check your Inbox for a confirmation email containing a confirmation link. Once you VERIFY your email by clicking on the confirmation link in the message, you will never miss any future articles.






12 thoughts on “How to Root Gingerbread Sony Ericsson Xperia X10”
Good morning Mr Funsho. Thank u for dis tutorial. Pls I want u to assist me on how to root my Tecno d3. Thank u and God bless.
Gud morning mr funsho, pls can u help me the link which i can use to download pes 2014 apk and data. pls i need ur help.
pls will dis process help me upgrade my x10 to version 4
The abv is d 1st & important step 2 take in updating ur x10, am coming up wit d rest tutorial after i finished d write up.
Only PES 2014 PC version is available 4 now but an Android version is nt yet available.
Please sir, please help me. How do i upgrade my tecno n3 to jellybean?
Funsho please help me out, can sum1 upgrade HTC OS2 to OS4 so as to take bbm
The tutorial will be made for it here very soon.
Yeah, very much possible, just special ur HTC type 4 me 2 guide u.
You can root ur tecno D3 wit N3/T3 method dat are in d link below;
How To Root Tecno n3, T3 & n7 Android Mobile Phone
Funsho is HTC TELL
Ok, first of all root ur phone wit d method in d link below:
shelaf.com/2013…
Then, follow d instruction in d link below 2 update ur phone:
shelaf.com/2013/08/how-to-update…