Are you tired of being limited by your music streaming service? Look no further than Audiomack, the dynamic app available on both Android and iOS. With Audiomack, you can listen to songs online or offline and even download songs for later listening.
And the best part? You can easily transfer those downloaded tracks straight to your phone! No more relying on an unstable internet connection or worrying about data usage. In this ultimate guide, we’ll walk you through the step-by-step process of unlocking unlimited beats by downloading and transferring songs from the app straight to your Android phone.
While iOS devices may have their limitations, Android users can fully take advantage of this feature with the help of the X-plore app, which we’ll guide you through. You can always have your favorite tracks with you, no matter where you are or if there is bad internet connectivity. Continue reading to learn how to make the most of the app and improve your listening experience.
Recommended: 7 Android ES File Explorer Features You Never Knew Of
Contents
Steps to download and transfer songs from Audiomack straight to your phone
In this ultimate guide, we will take you through the steps required to download and transfer songs from the app straight to your phone. By following these simple instructions, you can enjoy unlimited beats from the app’s vast music library on your Android device, anytime, anywhere.
Step 1: Open the application
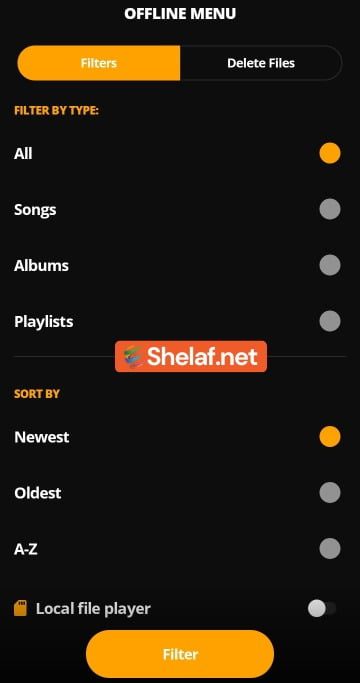
To get started, open the Audiomack application on your Android device. Once you have accessed the app, navigate to the Offline area on the main screen. Here, you will find a list of music files that have been downloaded for offline mode or songs that you have downloaded to play without an internet connection. To access these files, locate the ‘Offline-Only’ songs by opening the app, going to My Library, and selecting Offline-Only.
Step 2: Arrange the songs to suit the song you want to transfer
Next, arrange the songs by the song you wish to transfer. You can switch the sort from Newest to Oldest after you’ve entered the Offline section, depending on the music you wish to download to your phone. Use Oldest for songs you downloaded a long time ago, and Newest for brand-new songs.
Step 3: Open a File Manager or X-plore File Manager App
Now, you need to open a File Manager or X-plore File Manager App. We recommend using the X-plore File Manager app, which can be downloaded from the Google Play Store. Once you have opened the X-plore File Manager app, head to Internal Storage on your phone. If you have an SD Card on your device and prefer to store programs and files there, you can later move the songs to SD Card Storage.
Step 4: Locate the App file directory
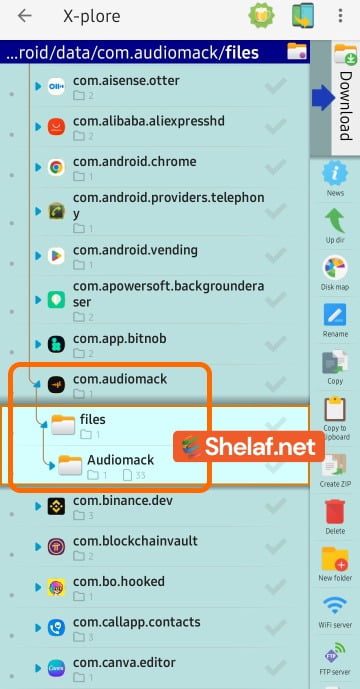
Next, locate the app file directory. After accessing the Internal Storage, go to Android >> Data >> com.audiomack. Users of mobile devices running Android versions before Android 11 may notice that their Android >> Data folder is empty due to restrictions placed on such directories. In this case, you will need to provide the X-plore folder one-time access to the Data folder before utilizing it.
Step 5: Locate tracks in the App folder
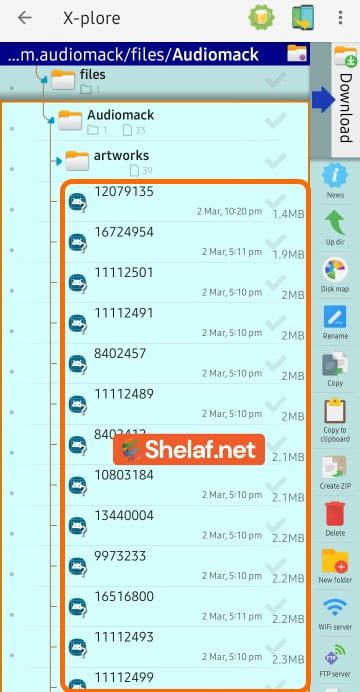
To access the music you downloaded, go to the app folder. However, the files won’t be in the usual format you’re familiar with, so you need to proceed to the next step. Once you click on the com.audiomack folder, you will see a Files option, and then click on the second folder.
Also Read: The Top 6 Free YouTube to MP3 Converters of 2023
Step 6: Change the file extensions of each to .mp3
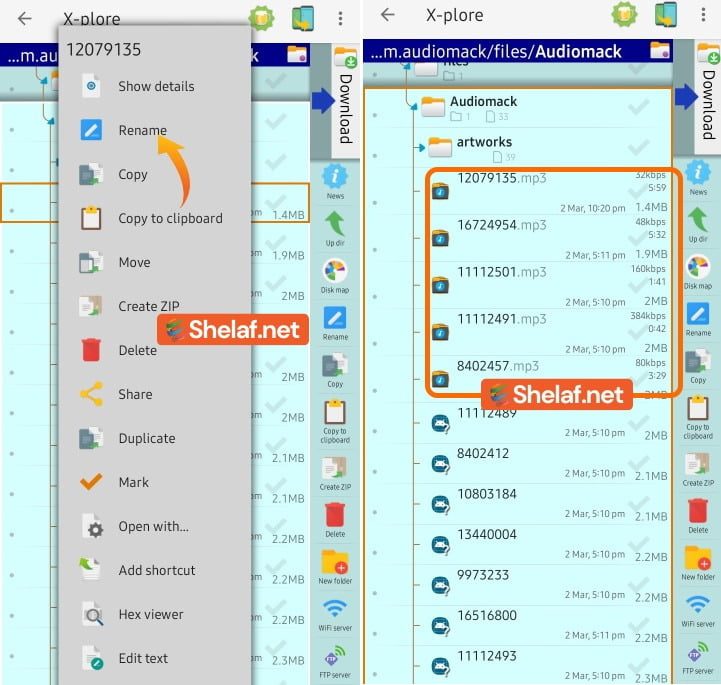
After opening the app folder, you’ll notice a list of odd files. If you want to transfer all the files there, you’ll need to rename the file extension of each file to .mp3. Properly organizing all your songs on app can help you identify the song you’re renaming from the X-plore File Manager app.
To do this, hold down a single file, then right-click Rename to view the options window. You can use any name you want, or use the song’s title, but make sure to change the last file extension to .mp3.
Step 7: Move tracks to the folder of your choice
Once you have changed the file extensions for all the files in the folder, you can now move the songs to the desired folder location on your Android device and use the built-in music player app to play them.
Final Thoughts
Audiomack is a fantastic app that allows you to enjoy your favorite music offline. With the help of this guide, you can now download and transfer songs from the app to your Android device with ease. By following the steps outlined in this article, you can organize your music library and listen to your favorite tracks at any time.
If you encounter any issues or have any questions about the process of transferring songs from the app to your phone, please leave a comment below. We hope this guide has helped unlock unlimited beats and enhance your music listening experience on the app. Happy listening!


